How to make a good Agent
Learn what makes a great prompt and how to get the best out of your agents.
What makes a good prompt, and why it matters
The quality of your SchemeFlow agent comes down to one thing: the prompt. A well-written prompt produces consistent, accurate reports with minimal back-and-forth. A vague prompt produces unpredictable results that need manual correction, which defeats the purpose of automation.
This article covers how to write prompts that work reliably across your documents. You do not need any background in programming or language models. If you can write a clear set of instructions for a colleague, you can write a good prompt.
Workflows vs. Agents: keep it simple
Most SchemeFlow use cases are workflows. A workflow follows a fixed set of steps in order: read a source file, extract specific values, confirm them with you, populate the document. The steps do not change between runs.
This is a good thing. Fixed steps are predictable. They produce consistent results. They are easy to test and easy to fix when something goes wrong.
An agent, by contrast, makes decisions on the fly. It chooses which step to take next based on what it finds. This flexibility is useful in some situations, but it also introduces unpredictability. If the tool is making choices you did not anticipate, it becomes harder to trust the output.
Start with a workflow. Define every step in advance. Only introduce decision-making when you find that fixed steps keep breaking because the source data varies too much between documents. Even then, keep the decision points narrow and well-defined.
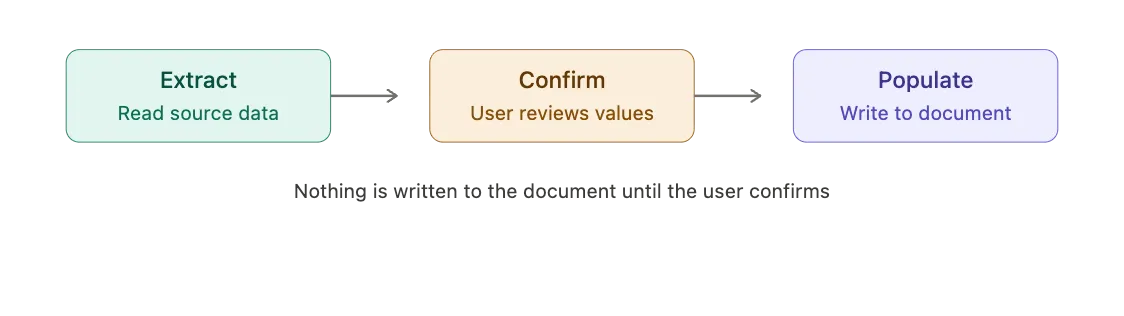
The golden rule: Extract, Confirm, Populate
Every SchemeFlow prompt that moves data from a source into your document should follow three phases.
Extract. The tool reads your source material, whether that is a handwritten PDF, a CSV export, or a database report, and pulls out all the relevant values. It organises them into a clear list.
Confirm. The tool presents that list to you and asks you to review it. You check the values, correct anything that is wrong, and give the go-ahead. This step is not optional. Without it, incorrect data goes straight into your report with no opportunity to catch it. Silent errors in engineering reports are not acceptable.
Populate. Only after you have confirmed the data does the tool write it into the Word document. This ensures that every value in your finished report has been reviewed by a human before it was inserted.
The confirm step is what separates a reliable tool from a risky one. It takes a few seconds and prevents hours of rework.
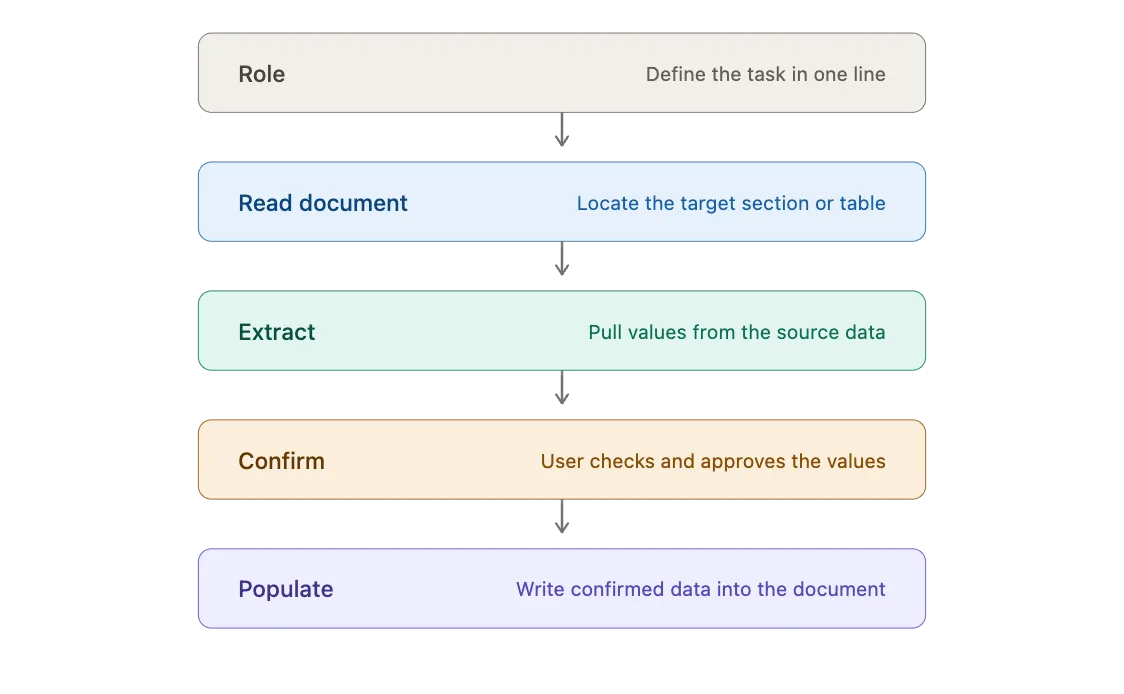
Structure your prompt in clear numbered steps
A good prompt reads like a set of numbered instructions. Each step describes one logical action. The tool follows them in order, top to bottom.
Here are the structural rules to follow.
Always start by reading the Word document. The tool lives inside your document. It needs to read the document first to understand what it is working with. Your first step should always be something like: "Read the current Word document and locate Section 3.2." The only exception is when the very first action is requesting a file upload from the user, in which case reading the document should be the next step.
Never split file upload and file reading into two steps. From your perspective, attaching a file and having the tool read it is a single action. Your prompt should treat it that way. Write "Ask the user to attach the CSV file and read it" as one step, not "Step 1: Ask the user to attach the CSV. Step 2: Read the CSV."
Use one step per logical action. Each step should do one clear thing. Do not combine unrelated tasks in a single step, and do not split a single task across multiple steps. If a step needs more than two sentences to explain, it is probably doing too much.
A typical prompt follows this structure:
- Role: A single line describing what the tool does. "You are a transport planning assistant. Your task is to populate the trip generation table from ITE data."
- Read the document: Read the Word document and locate the target section or table.
- Extract: Read the source data and pull out all relevant values.
- Confirm: Present the extracted values to the user for review.
- Populate: Write the confirmed data into the document, following specific formatting rules.
Write positively, not negatively
Tell the tool what to do, not what to avoid. Negative instructions ("do not", "never", "avoid") are less reliable than positive ones. When you describe the desired behaviour directly, the tool is far more likely to follow it.
This does not mean you can never use negative phrasing. Guardrails like "do not edit outside Section 4" are fine and important. But for core instructions, lead with the positive action.
| Instead of this | Write this |
|---|---|
| Do not insert values on a new line below the label. | Insert each value on the same line as its label, immediately after the colon. |
| Do not guess if a field is illegible. | Flag any illegible fields to the user and ask for clarification before proceeding. |
| Never change the formatting of existing text. | Preserve all existing fonts, font sizes, bold, italic, and underline formatting when inserting new values. |
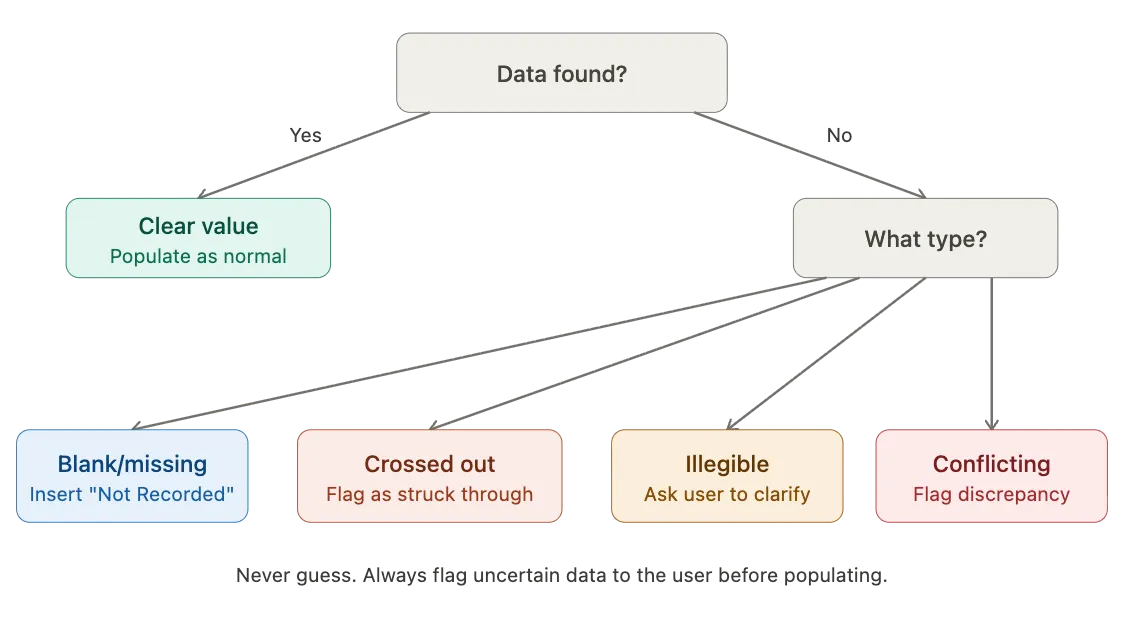
Handle missing data explicitly
Source documents are messy. Handwritten forms have blank fields, crossed-out entries, and illegible handwriting. Your prompt needs to account for each of these scenarios. If you do not, the tool will either guess or stop, and neither is what you want.
Blank or missing fields. If a field exists in the template but has no corresponding value in the source, insert "Not Recorded" (or whichever placeholder your firm uses). Do not leave the field blank and do not delete it, unless the prompt specifically includes deletion rules for that field type.
Crossed-out values. A crossed-out value is not the same as a missing value. It means someone recorded something and then deliberately removed it. Your prompt should instruct the tool to note the value as struck through and flag it to the user during the confirm step. Do not treat it as blank.
Illegible values. If the tool cannot read a handwritten entry with confidence, it should flag it to the user with as much context as possible ("Field 3.2 appears to read '14.5m' but is unclear"). It should never guess. Let the user decide.
Conflicting data. Sometimes the source document and the template contain conflicting information, or two source documents disagree with each other. The tool should flag the discrepancy to the user during the confirm step and wait for a resolution before populating anything.
One agent, one goal
A prompt that tries to do everything will do nothing well. Each prompt should have a single, well-defined purpose: populate one table, complete one section, process one type of source data.
Narrow scope produces better results for two reasons. First, the tool has less room to misinterpret what you want. Second, when something goes wrong, you know exactly where to look.
If your report has multiple sections that each require different source data or different logic, split them into separate prompts. You can chain prompts together so the user works through them in sequence: complete Section 1, then move to Section 2. Each prompt handles its own scope cleanly.
A good rule of thumb: if your prompt is longer than one page, or if it handles more than one type of source data, consider splitting it.
Edit boundaries: tell the tool where to start and stop
Without clear boundaries, the tool may edit content outside the target area, overwrite formatting, or delete paragraph marks that hold your document structure together. Every SchemeFlow prompt should include these four rules.
- Define the edit range. State exactly where the tool should start and stop. Use section headings, table numbers, or other landmarks. "Edit only the content between the heading 'Site Description' and the heading 'Methodology'. Do not modify anything outside this range."
- Preserve paragraph marks and line breaks. When replacing placeholder text, replace only the placeholder. Do not remove the paragraph mark at the end of the line. Do not merge lines together.
- Insert inline, not below. When populating a field that sits on the same line as its label, the value must go on that same line. Do not insert it as a new paragraph below.
- Do not alter existing formatting. Unless the prompt specifically says otherwise, all existing fonts, sizes, bold, italic, and underline styles should be left untouched.
Include these rules at the end of every prompt under an "Important Rules" heading. They are easy to forget and expensive to debug.
Test and iterate one thing at a time
Once you have written a prompt, test it with a real document and real source data. Run through the full workflow: upload, extract, confirm, populate. Check the output in Word carefully, including formatting, spacing, and paragraph marks.
When something goes wrong, change one thing at a time. If you rewrite three steps at once and the output improves, you will not know which change fixed it. If the output gets worse, you will not know which change broke it.
Keep a short log of what you changed and what happened. This makes it much easier to roll back if a change introduces a new problem.
Common mistakes to avoid
- Splitting "upload the file" and "read the file" into two separate steps.
- Forgetting the confirm step, allowing unreviewed data into the document.
- Not telling the tool where to stop editing, so it overwrites content in the next section.
- Treating crossed-out values as missing instead of flagging them as deliberately removed.
- Writing a single prompt that covers an entire multi-section report instead of breaking it into focused prompts.
- Using vague instructions like "fill in the rest" instead of specifying exactly which fields to populate.
- Forgetting to include formatting rules, so inserted values do not match the document style.
- Not specifying what to do with blank or illegible fields, leaving the tool to guess.
- Changing multiple things between tests, making it impossible to identify what fixed or broke the output.
- Hardcoding a list of fields in a prompt that needs to work across different document versions.
Need help?
If you are unsure how to structure a prompt, or if your prompt is not producing the results you expect, reach out to the SchemeFlow team. We have built prompts across dozens of document types and can help you get yours right quickly.